• Make Over Arena

Facebook Shop – Sell on Facebook | Ecommerce With Facebook Shop

As an entrepreneur or a business person do you feel like your business or your products are not getting the right traffic you expect. Let ...

How Do You Delete a Page on Facebook?

 Business Page, Facebook Page, Pages     1 comment   

How do you delete a page on Facebook?: So, how do you get rid of a Facebook page you no longer want to manage? Do you just abandon it there or what?
Deleting a page on Facebook is as easy as signing up / creating the Facebook page in the first place. But one thing is very compulsory before one can remove his or her Facebook page from Facebook - "You must be an admin of that page". Also note that if there are other admins in the page - it's your duty to let them know that you will schedule the page for deletion else they might go back after you've schedule the page for deletion and cancel the deletion process.

So how can you delete a page you created on Facebook?

 To delete your page, you should follow the step by step instructions borrowed from Facebook help center to delete your page.

How Do You Delete a Page on Facebook?

How to delete a Facebook Page Permanently and Immediately


If you have fully made up your mind to let go of your Facebook account, then you must check to see that you are the admin of the page you plan to delete, you'll need an admin login priviledge of that particular page you wish to get rid of. If you are sure you own that page, then follow the steps underlined below to easily remove your Facebook page.

How to remove a Facebook Page

  1. Click Settings at the top of your Page
  2. From General, click Remove Page
  3. Click Delete [Page name]
  4. Click Delete Page and then click OK
Also keep in mind your Page won't be permanently deleted until 14 days has elapsed, but you can unpublish your Page at any time.

How to cancel or Undo Facebook Page deletion

Follow the tips below to cancel your Facebook page deletion:
  1. Go to your Page within 14 days of scheduling to delete your Page
  2. Click Cancel Deletion at the top of your Page
  3. Click Confirm and then click OK


Note that you can also delete your personal Facebook account.
Note: In the case where you can't find the delete option on your FB Page, make certain that you're truly an admin of that Page.

Is this guide still confusing or do you find anything hard to do? Please leave us with a comment describing the problem or read these guides:
  • How To Delete A Facebook Page 
  • How do you delete a page on Facebook Android?
  • How to Create A Facebook Business Account 
  • How to Hide Pages You Follow on Facebook

Please share this article on Facebook.
Read More
  • Share This:  
  •  Facebook
  •  Twitter
  •  Google+
  •  Stumble
  •  Digg

How to Remove Someone Who Likes Your Facebook Page

 Facebook Page, Pages     No comments   

How to Remove Someone Who Likes Your Facebook Page: Yes, you can remove anyone who likes your page - I didn't know this Facebook feature existed. Just got into a serious argument with my wife that it doesn't exist. Guess after publishing this post, I'll share it to her wall.

It is very possible to remove people who liked your Facebook Page and they'll no longer like it. But also keep in mind that Facebook Pages are public spaces, and people you've removed can choose to like your Page again. If you think they are bombarding your page with spam posts, then, banning them from your page is the best option.

Banning? see how to ban someone on Facebook page here.
Banning someone from your Facebook Page is like blocking someone from your main Facebook account, they'll no longer be able to like your Facebook page ever again. 
People you ban will still be able to share content from your Page to other places on Facebook, but they'll no longer be able to publish to your Page, like or comment on your Page's posts, message your Page or like your Page. We recommend banning people who continually publish spam on your Page.

How To remove someone who likes your Page:

  1. Click Settings at the top of your Page
  2. Click People and Other Pages in the left column
  3. Click to check the box next to the person you want to remove
  4. Click and select Remove From Page Likes
  5. Click Confirm
How to Remove Someone Who Likes Your Facebook Page

Please share this post on Facebook. Thank you!
Read More
  • Share This:  
  •  Facebook
  •  Twitter
  •  Google+
  •  Stumble
  •  Digg

View Your Blocked Facebook List and Unblock Friends

 Blocked, Blocked List     5 comments   

Learn How To View Blocked List  on Facebook and Unblock Friends: Your Facebook account is entirely yours and you can choose whatever settings available to any user that is available to you as well and do whatever you wish to use it for. If you have decided to pay a visit to your prisons (BLOCKED LIST), it's up to you. Our goal is to show you the route to the prison yard.


Facebook blocked list


One thing is to create a Facebook profile another thing is in the usage. As you may have already observed, sometimes you add friends who turns out be a snake in a green grass and so you decided to block them.

And sometimes, because of how frequent people tend to break your heart, you decide to block even people that are innocent.... so you want to go back to cross check if you've mistakenly blocked your true friend.  How do you get there? This post will help you figure it out!

How To See Your Blocked List On Facebook


When you unblock someone, that person will be able to see your posts on Facebook that you share with the public. The person won't automatically become your friend on Facebook. If you want to become friends with a person who you've unblocked, you'll need to send them a friend request again.
To unblock someone:
  1. Click in the top right of any Facebook page
  2. Click Privacy Shortcuts
  3. Click How do I stop someone from bothering me?
  4. Click View All Blocked Users.
  5. Click Unblock next to the name of the person you want to unblock.

It's your choice to unblock them when you see your blocked list on Facebook. Cheers! Please share this article.

Source: How To View Your Blocked List On Facebook


If you find this article confusing, then see our other resource pages:

  • Where to see blocked list on Facebook
  • How To Unblock Friends And People On Facebook
  • How to block someone on Facebook Messenger 
 Or leave your comment below. Please share!!!
Read More
  • Share This:  
  •  Facebook
  •  Twitter
  •  Google+
  •  Stumble
  •  Digg

Ways to View Deleted Messages on Facebook

 Access Facebook, Account, App, Archive, Messages, Messenger, People, Profile     No comments   

Ways to View Deleted Messages on Facebook - Everyone’s done it – deleted a Facebook message they meant to keep (sometimes the trigger-happy clicker finger can cause serious remorse.) People think they’ll never see their messages again. But this is not the case. That’s right, a time machine isn’t necessary to retrieve deleted messages. Facebook knows the accidental deletion of messages can happen and they’ve created an easy way for anyone with an account to go back and view everything they’ve done on their account.


See: How to See Someone's Location on Facebook

Recover deleted Facebook messages from a downloaded archive

In order to receive deleted messages in Facebook, you’ll first need to log-in to the Facebook account you want to retrieve messages from.

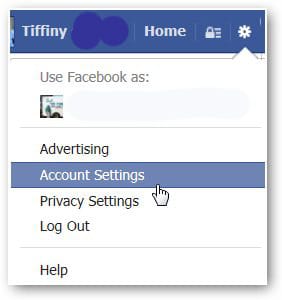
STEP 1 : Go to “Account Settings”

After you’re logged in, go to “Account Settings” in the top right corner of the window.
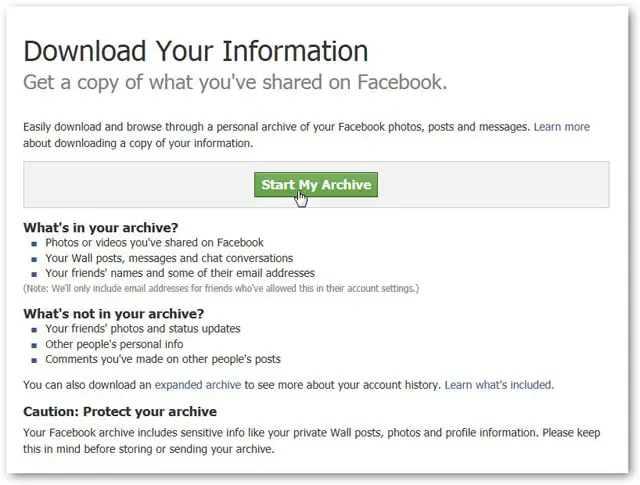
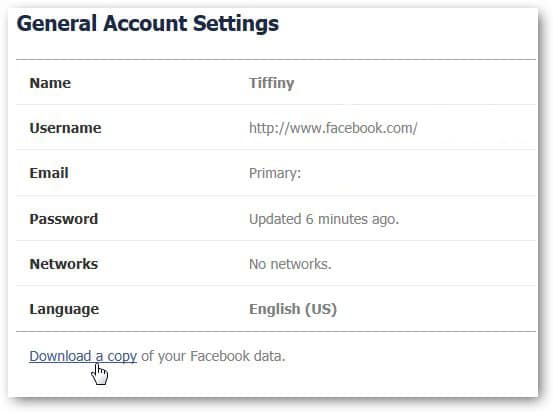
STEP 2: Once the “General Account Settings” page loads, click on “Download a copy of your Facebook data” at the bottom of the page.

Download Your Archive

STEP 3: After you click on the “Download a copy…” link, you’ll be brought to a page where you can download everything you’ve done on your Facebook account since the birth of your account. Click on the green button that says “Start My Archive.”


See: How to Login Instagram With Facebook 2017
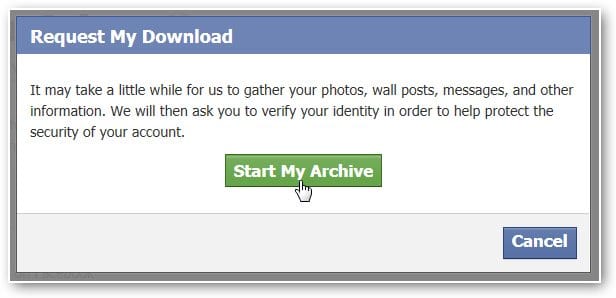
After you click the green button, the small dialog box “

STEP 4: Request My Download,” will open, informing you it can take a while (typically 2-3 hours) to gather all of your information. Click “Start My Archive” again to launch the gathering process.


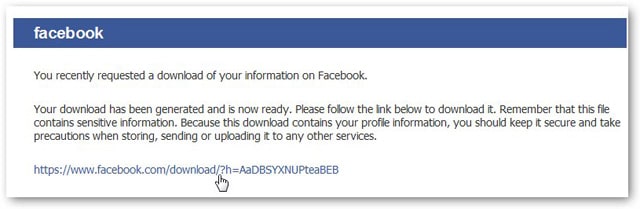
STEP 5: And that, you’ll be told to go to the email account associated with your Facebook profile where a download link to your archive will be sent. Again, it may take 2-3 hours to arrive. Once it does, click on the link in the email to download your archive.


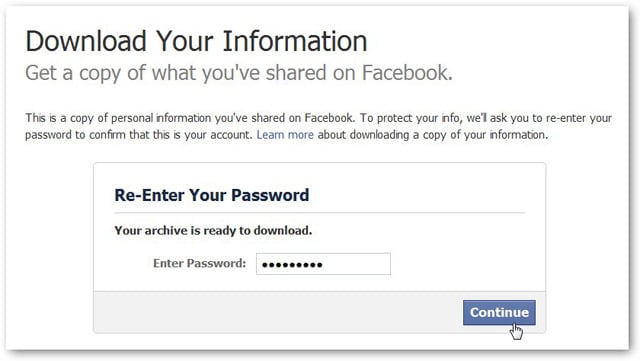
STEP 6: And before you can download the archive, you will need to reenter your password.


STEP 7: Finally, click on “Download Archive” button that appears after entering your password. Your archive will download to your computer. Unzip it, then open the file named “index.”

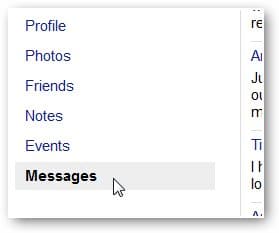
The file containing your archived data will open and click on “Messages” and all of your past messages will load.


To easily find the message you’re looking for, search by keyword. Press “CTRL + F” or “F3” to access the keyword search process, and that’s it. Once you find the message, copy and paste the contents into a Word document to save.


See: Facebook Logout All DevicesYou’ve got to love Facebook for providing such an in-depth archiving feature. There is a myriad of reasons people need to retrieve deleted messages, and this feature fills this need. Just remember, it can take a few hours to extract your archive, so plan accordingly.
Read More
  • Share This:  
  •  Facebook
  •  Twitter
  •  Google+
  •  Stumble
  •  Digg

Facebook Log out All Devices

 Access Facebook, Account, Facebook for Business, Login, Reset Facebook Password, Settings     No comments   

Facebook Log out All Devices- Your Facebook account may have everything personal in it and you should take Facebook account’s security seriously otherwise you may be going to expose your personal stuff. You should know how to make your account more secure using available security options and keep looking to Facebook log in sessions and log out Facebook remotely from all devices if found any suspicious activity.

Lets explore some Facebook security settings where you can see all logged in sessions and logout Facebook from all devices or locations, set login notifications, Set security code and much more.

See: How to Access Facebook Full Site on Mobile Phone | Latest Method

The Where You're Logged In a section of your Security and Login Settings shows you a list of devices and browsers that have been used to log in to your Facebook account recently. Each entry includes the date, time and approximate location when logging in, as well as the type of device used to access your account.


>>> To log out of Facebook on another computer, phone or tablet:

>>> Go to your Security and Login Settings

>>> Click on the Where You're Logged In section

>>> Find the session you want to end and click End Activity

>>> Clicking End Activity will immediately log you off of Facebook on that computer, phone or tablet.

See: How to Login Instagram With Facebook 2017


Read More
  • Share This:  
  •  Facebook
  •  Twitter
  •  Google+
  •  Stumble
  •  Digg

DEACTIVATE FACEBOOK MESSENGER

 App, Facebook Account, Messenger, Settings, www.facebook.com/help/delete account     No comments   

DEACTIVATE FACEBOOK MESSENGER

You can only deactivate Messenger if you previously deactivated your Facebook account.

To deactivate Messenger after you’ve deactivated your Facebook account:

  • Open Messenger
  • Tap your profile picture in the top left corner > Privacy & Terms > Deactivate Messenger
  • Enter your password and tap Continue
  • Tap Deactivate

To reactivate Messenger, log in with your username and password.

Note:
If you deactivate both Facebook and Messenger and then reactivate Messenger, your Facebook account will also be reactivated.
Read More
  • Share This:  
  •  Facebook
  •  Twitter
  •  Google+
  •  Stumble
  •  Digg

How to delete Multiple Photos on your Facebook Account

 Account, Delete, Photo     No comments   

How to delete Multiple Photos on your Facebook Account: In this article of how to delete multiple photos on Facebook, we are going to be looking at the process involved in removing Facebook photos of you from Facebook.

How to delete Multiple Photos on your Facebook Account

How to delete Multiple Photos on your Facebook Account.

To delete multiple photos from Facebook, go to individual photo and delete delete it. Preferably, delete the Facebook album housing the pictures you wish to delete.

N/B: Keep in mind that once a photo is deleted, you won't be able to get it back.

How to delete Photos on Facebook

To remove your photos from Facebook:
  • Click the photo to open it
  • Click Options on the menu bar below the photo
  • Select Delete This Photo and click Confirm

How to delete photos from Facebook Album

To delete Facebook photos from an album, simply go to the album you wish to delete photos from.
Follow the steps above to delete each picture you want to remove. 

How to remove photos from Facebook that someone else posted

You can only delete photos that you've uploaded. If you want someone else's photos of you to removed from Facebook, ask the person who posted it to take it down. You can also remove a tag from a photo you're tagged in.

How do I delete all my pictures on Facebook?

To delete all your pictures from Facebook, go to individual photo album and delete them one after the other. Mind you, you cannot delete profile picture and cover photo album because they weren't created by you.

Smart Learn: How to delete Facebook Account

How to delete photos from Facebook mobile

The same method explained above is applicable to Facebook mobile users. So, apply the method and see your pictures deleted ASAP.


What to do? Go to the album and use the method specified above to delete every picture in it.


Please share this article!
Read More
  • Share This:  
  •  Facebook
  •  Twitter
  •  Google+
  •  Stumble
  •  Digg
Newer Posts Older Posts Home

Blog Archive

  • ▼  2019 (3)
    • ▼  July (3)
      • ▼  Jul 07 (3)
        • Facebook Shop – Sell on Facebook | Ecommerce With ...
        • Facebook Advertiser Community – Facebook Marketpla...
        • Link Facebook to Instagram | Facebook Instagram Login
  • ►  2018 (1659)
    • ►  December (9)
      • ►  Dec 22 (5)
      • ►  Dec 21 (4)
    • ►  November (158)
      • ►  Nov 26 (1)
      • ►  Nov 25 (1)
      • ►  Nov 24 (4)
      • ►  Nov 23 (6)
      • ►  Nov 22 (8)
      • ►  Nov 21 (27)
      • ►  Nov 20 (69)
      • ►  Nov 19 (20)
      • ►  Nov 15 (6)
      • ►  Nov 03 (6)
      • ►  Nov 02 (2)
      • ►  Nov 01 (8)
    • ►  October (375)
      • ►  Oct 31 (16)
      • ►  Oct 30 (5)
      • ►  Oct 29 (32)
      • ►  Oct 27 (12)
      • ►  Oct 25 (1)
      • ►  Oct 24 (40)
      • ►  Oct 23 (20)
      • ►  Oct 15 (50)
      • ►  Oct 14 (53)
      • ►  Oct 13 (146)
    • ►  June (300)
      • ►  Jun 07 (50)
      • ►  Jun 06 (50)
      • ►  Jun 05 (50)
      • ►  Jun 04 (50)
      • ►  Jun 03 (50)
      • ►  Jun 02 (50)
    • ►  May (791)
      • ►  May 30 (31)
      • ►  May 28 (99)
      • ►  May 26 (50)
      • ►  May 25 (50)
      • ►  May 24 (47)
      • ►  May 23 (50)
      • ►  May 22 (50)
      • ►  May 21 (50)
      • ►  May 20 (49)
      • ►  May 19 (50)
      • ►  May 18 (25)
      • ►  May 17 (50)
      • ►  May 16 (25)
      • ►  May 15 (25)
      • ►  May 14 (25)
      • ►  May 13 (25)
      • ►  May 12 (40)
      • ►  May 09 (50)
    • ►  April (26)
      • ►  Apr 11 (25)
      • ►  Apr 10 (1)
  • ►  2016 (1)
    • ►  October (1)
      • ►  Oct 18 (1)

Copyright © FreeStyle Developers